Suzuki Hatch 1984

Browse through a range of Suzuki projects (NO tech questions here!)
peter_fc
Posts: 24
Joined: Sun Jun 26, 2011 8:46 pm
Location: Kensington, NSW

Hey all.
Thought i'd put up some photos and a little bit about my latest project.
I recently aquired a 1984 hatch from a customer of mine.
He told me it was a mighty boy, but then when he brought it past work i realised it was a hatch, but none the less, i thought it would be a cool parts delivery car.
This is how it started out life.
001.jpg
002.jpg
So we started stripping it ready for paint.
We started by painting all the door appetures and insides.
003.jpg
004.jpg
Put it in primer and rubbed it ready for paint.
010.jpg
011.jpg
012.jpg
014.jpg
015.jpg
The original interior colour was a tan colour, which suited me fine as i had some tan leather seats lying around the shop which i purchased for a project years ago and never used. I measured them up and they would just fit. So in they went.
016.jpg
More photos to come (maximum upload is 10)
Leondis Racing
Speedflow Braided Line & Fittings - (02)9662 6344
peter_fc
Posts: 24
Joined: Sun Jun 26, 2011 8:46 pm
Location: Kensington, NSW

020.jpg
So i decided to put some 13 inch hyundai excell wheels on it to drive me around while i could save for some mags.
018.jpg
021.jpg
I chose the white 15's. It was a little too high so i decided to install some coil over suspension. The coil over kit was made for a honda civic, but when i measured the coil over section and spring height and width, it all seemed to work. I assembled the first strut, and it worked fantastic, so i completed the other one.
022.jpg
023.jpg
027.jpg
028.jpg
032.jpg
As we are a speedflow dealer, i decided to make a custom gear shifter.
033.jpg
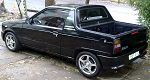
There are still some minor things i want to do to the car, but for the most part, its all complete.
I still need to lower the rear end and set the overall height, and i wanted to install a momo style steering wheel, and in terms of the engine, a sneaky pete nos system is on the cards for the big block 800.
Hope you guys enjoy the pics.
Leondis Racing
Speedflow Braided Line & Fittings - (02)9662 6344
User avatar
Brayden
Posts: 9101
Joined: Sun Apr 11, 2004 3:09 am
Location: Canberra ACT
Contact:

Very neat, and a beautiful colour. 8)
F8B EFI turbo - Three pots and a snail.
User avatar
Psi_Wagon
Posts: 447
Joined: Sun Jul 20, 2008 11:04 pm
Location: Melbourne, North-West
Contact:

nice hatch man!

im interested in the front struts you made. is the coilover sleeve just a sleeve welded onto your strut?
http://www.calaisturbo.com.au/showthread.php?t=180305
peter_fc
Posts: 24
Joined: Sun Jun 26, 2011 8:46 pm
Location: Kensington, NSW

At the base of the coil over seeve it is tapered.
The original strut also has a taper at the base and as chance has it, the coil over sleeve taper slides perfectly in this.
I used the original top strut rubber and cap.
Leondis Racing
Speedflow Braided Line & Fittings - (02)9662 6344
User avatar
Tez
Posts: 1176
Joined: Wed Sep 03, 2008 9:38 pm
Location: Croydon, Vic

Nice job.

I'm so glad you did the interior... ABSOLUTELY NOTHING WORSE than admiring a nice shiney new (blue?) paint job to find the metalwork on the interior of the car or under the bonnet is red... or a schmick looking metallic green car that's black or yellow on the inside or in the engine bay... :-( Inside hasta match the outside or else it's a total waste of effort in my mind.

Yours looks the goods. - Too nice now for a parts delivery vehicle! :)

Cheers
Tez
So the adventure continues...
peter_fc
Posts: 24
Joined: Sun Jun 26, 2011 8:46 pm
Location: Kensington, NSW

Cheers for the great feedback.
I'll keep you all posted with more updates as more work gets done.
Just some shots of the inside.
024.jpg
026.jpg
I did change all the wheel studs to 12 x 1.25 to accomodate the new wheels and the conversion was quite easy.
I'm not sure if there is a tech article on this but i can supply the part number of the studs used and how i went about doing it if anyone is interested.
Cheers
Leondis Racing
Speedflow Braided Line & Fittings - (02)9662 6344
User avatar
Husky
Posts: 502
Joined: Tue Jan 05, 2010 8:59 pm
Location: Sydney, NSW

peter_fc wrote:Cheers for the great feedback.
I'll keep you all posted with more updates as more work gets done.
Just some shots of the inside.
024.jpg
026.jpg
I did change all the wheel studs to 12 x 1.25 to accomodate the new wheels and the conversion was quite easy.
I'm not sure if there is a tech article on this but i can supply the part number of the studs used and how i went about doing it if anyone is interested.
Cheers
great work mate! I would love the info on wheel studs/how to etc Cheers
rfburns
Posts: 25
Joined: Sat Sep 11, 2010 8:03 am

Nice work! Really like the colour looks HOT
Get with it ,Get over it ,Get on with it...OR LEAVE!
User avatar
supervan
Posts: 510
Joined: Sun Apr 04, 2010 7:33 pm
Location: BRISBANE

wow the colour is very nice whats the colour called :?: the tan seats sure do go with the paint. looks great i bet she turns some heads now...

oh and that gear shifter is coooool 8)
....its not miles per gallon its smiles per gallon....


1990 f10a supercarry 5speed
small van big plan
User avatar
Brayden
Posts: 9101
Joined: Sun Apr 11, 2004 3:09 am
Location: Canberra ACT
Contact:

peter_fc wrote:I did change all the wheel studs to 12 x 1.25 to accomodate the new wheels and the conversion was quite easy.
I'm not sure if there is a tech article on this but i can supply the part number of the studs used and how i went about doing it if anyone is interested.
That info would be fantastic if you're happy to write it up. :thumbup1:
F8B EFI turbo - Three pots and a snail.
peter_fc
Posts: 24
Joined: Sun Jun 26, 2011 8:46 pm
Location: Kensington, NSW

Yeah, it sorta gets a little more attention now than before. The colour is a Dacia colour.

In regards to the wheel stud conversion, this is how it was done.
After measuring up all the relative dimensions and cross referencing them with one of the manufacturers detail books, i came up with the part number - NS429
This is from a manufacturer called NICE Products. The warehouse is in Marrickville, Sydney, but nearly all parts suppliers should have this part number in stock.
You will need a total of 16, so just check with your parts shop they have all 16 in stock.
The rear conversion was done in this way:
Once you have removed the brake drums and put them on a bench, you can knock out the studs with a hammer. You will notice on the rear studs that there is a chamfered edge on these.
The new 12mm studs will have to be chamfered in the same way. I used an angle grinder to do this.
All the 10mm holes will need to be drilled out to 12mm and once this is done, you can start to pull the new studs through.
This is the part where you may need a rattle gun, or press, or perhaps a local mechanic can help with this.
I used a rattle gun to pull the new studs through. I turned the wheel nut so the flat part contacts to the flat part on the drum, wound it on to the new stud, and pulled it through.
The front was done in this way:
You will need to remove the front hubs to access the studs.
I removed the caliper and caliper bracket to do this. I then removed the CV nut. With a slide hammer i then pulled out the hub, complete with disc rotor. Once the 14mm headed bolts are removed from the disc rotor, the hub is then seperate.
In the same way as the rear, you need to knock out the studs, drill out the holes to 12mm, and pull the new studs through.
With the front conversion you will not need to chamfer the edge of the stud. This part number i have given you sits perfectly in the original groove. Once they are all pulled through you can re-assemble the hubs.
Please note that 12mm is the correct size hole for this stud. If the hole is drilled out too large then the knurled bit on the stud will be loose.
I hope this helps with anyone wanting to do the stud conversion.
Cheers.
Leondis Racing
Speedflow Braided Line & Fittings - (02)9662 6344
User avatar
Brayden
Posts: 9101
Joined: Sun Apr 11, 2004 3:09 am
Location: Canberra ACT
Contact:

Could you clarify the process of drilling out the holes? This is a crucial step because if you don't get the hole dead on you'll end up with a wicked vibration.
F8B EFI turbo - Three pots and a snail.
peter_fc
Posts: 24
Joined: Sun Jun 26, 2011 8:46 pm
Location: Kensington, NSW

To drill out the stud holes from 10 to 12mm i used a drill press.
You need to drill the holes square so a drill press will enable you to be accurate.
If the holes are on an angle, when you pull the stud through, this will also be on an angle and either
a: the wheels will be very hard to fit, or
b: the wheel won't sit flush on the hub, resulting in an in-balance.
Hope this clarifies the process.
Cheers.
Leondis Racing
Speedflow Braided Line & Fittings - (02)9662 6344
peter_fc
Posts: 24
Joined: Sun Jun 26, 2011 8:46 pm
Location: Kensington, NSW

The sneaky pete just arrived today!!!!
photo.jpg
photo-1.jpg
Leondis Racing
Speedflow Braided Line & Fittings - (02)9662 6344
Post Reply